We’ve talked about camera settings and how to take better action photos but if you want to take your photography skills to next level, you will want to get to know a few key settings. Over the next few posts, we will be taking a deeper dive into some of the important techniques and settings in sports photography.
We begin with one of the most talked about subjects in photography, aperture. Aperture is the opening in the lens through which light travels through. The size of the opening can be adjusted to let more or less light in. The larger the aperture, the more light hits the sensor and the smaller the aperture, the less light will hit the sensor.
It might be easier to think about the aperture like the pupil of a human eye. The iris of your eye (which is the colored part of your eye around the pupil) expands and contracts, controlling the size of the pupil. The smaller the pupil, the less light can hit the retina. The camera works in a very similar way. The smaller the aperture, the less light that can hit the sensor.
The aperture is measured in f-stops. When you change the f-stop on your settings, you change the size of the opening in the camera. Here is the tricky part of aperture that might take some getting used to: the higher the f-stop number is, the smaller the opening. The smaller the f-stop is, the larger the opening.
This image from Wikipedia gives a look at f-stops. The size of the circle represents the size of the lens of the aperture. As you can see, the larger f-stop number, f/8, has a smaller aperture.
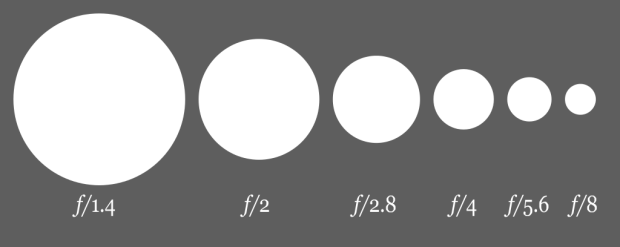
It might take some practice remembering that but for now just remember that the larger the number, the smaller the opening.
So how does aperture effect a photo? The aperture controls the depth of field of a photo, which is the amount of the photo that is in sharp focus. Have you ever seen a photo where the background of the photo is slightly blurred but the subject in the foreground is in sharp focus? That’s a shallow depth of field. A large depth of field is when the the entire scene is in sharp focus.
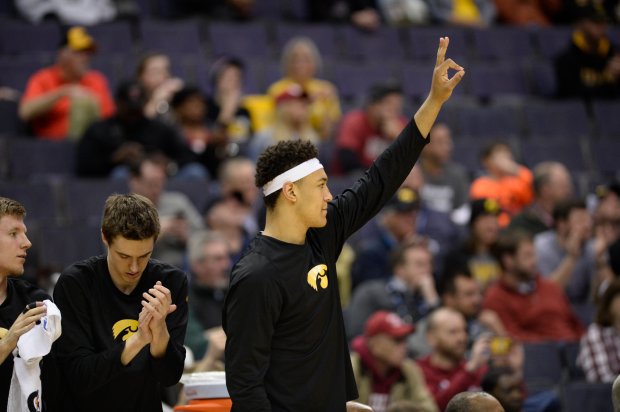
Let’s look at some examples. In this photo, there is a small or narrow depth of field, as the players are in focus but the fans and the fans are out of focus.
But in this photo, there is larger or wider depth of field. Even the players in the back are just as much in focus as the players closer to the camera.

The difference of these two photos depend on the aperture. So how can you change the aperture and create these different photos?
First you want to find the aperture of your lens. All lenses have a maximum and minimum aperture size and you will find these sizes printed on your lens. Older lenses have an aperture ring that you need to turn to adjust the aperture. You will see the numbers on the lens and you will adjust the ring to match the aperture you would like to set.
However, most modern don’t have aperture rings and instead, you set the aperture in the camera. The aperture can be set in Manual or Aperture priority mode. Aperture is designated on your screen as the number with the F in front of it.
Once you have found the right mode and adjusted the aperture, you can experiment shooting in different f-stops to capture different depth of field. Remember, if you want a particular subject to be in sharp focus, you would use a smaller aperture number. This isolates the foreground from the background making the foreground objects look sharper and the background blurred.
But if you want a wide or large depth of field, where most of the photo is in focus, like in the second photo, you would use a larger aperture number. This allows the image be in sharp focus from front to back with no blur.
Aperture also works together with shutter speed and ISO to create exposure but we’ll talk about that in a future post. For now, we recommend experimenting with the different aperture sizes to see how it makes a difference in your photos.
Be sure to check back for more blogs about the different camera settings for great sports photography or sign up to receive our blogs by email!


