New student Betsy Upton reached out to us to improve her sports photography so she could capture better photos of her son playing basketball and baseball. She already owned the proper equipment with a full frame Nikon body and a pro level 70-200mm lens, but she couldn’t figure out why all her images were coming out yellow and blurry.
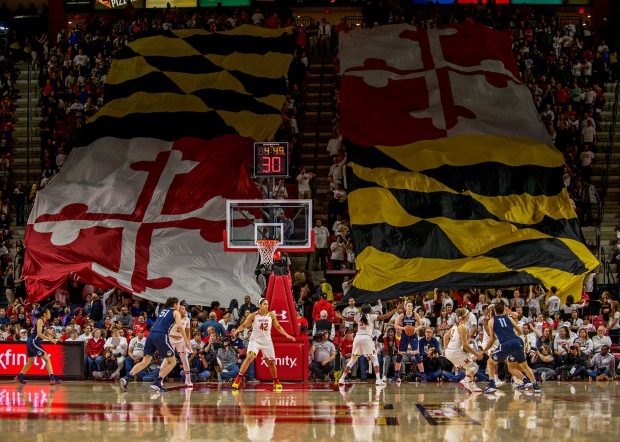
After sitting down with her and going over her settings, she admited that she was setting the camera in sports mode and letting the camera do all the work for her. After a quick lesson in white balance and how to set up the camera in manual mode, we headed out on the floor to shoot the George Mason vs Penn State basketball game.
Judging by her photos, she seems to have learned how to set up her camera properly and after she game she told me how she couldn’t wait for her son’s first game of the year to use everything she learned.
Congratulations to DC Sports Photography Academy student Art Pittman for signing a contract with USA Today Sports Images! All his hard work paid off in just a few short months.
If you’d like to learn how to shoot sports like a pro and get a professional sports photography contract like Art, contact us now.
If you have a budding photographer in your life, get them a gift they will absolutely love. Purchase a gift certificate for any package DC Sports Photography Academy offers and let them learn how to photograph sports right on the sidelines.
Contact DC Sports Photography Academy right now to purchase your gift certificate now!
DC Sports Photography Academy was just named one of the top 50 sports photography blogs for sports photographers on the internet!
We’ve been working really hard to try give our readers as much information as possible so they can improve their photography and it’s paying off.
The fall seaon has just started and there are a lot of games to choose from to come out and work on your skills. Contact us to start learning on the sidelines immediately.
DC Sports Photography Academy may be in our off-season but it doesn’t mean you can’t practice your photography! Last week we talked about taking candid photos. Today, we’re sharing some photography exercise you can use this summer to help you feel more confident with your camera.
Two Dozen
In this exercise, take two dozen unique photos of one location. Don’t move your feet. Just try to take different angles, different viewpoints and get creative with it.
10 Photos of 1 Subject
This exercise is similar to the one above because it forces you to find new angles. No photo should be the same. Shift angles from close up to far away to looking directly down at the object or straight across from. You will be able to see how small changes can make a big difference in your photos. If you want to make it even more challenging, pick a small object.
Guess the settings
This is a two person exercise. Ask a photographer friend to play it with you. Look at a photo from another photographer and try to guess the settings they used. You will be able to get a really great understanding of each different setting.
Recreate a photo
Also known as the “copycat” exercise, in this exercise, the idea is to take a few of your favorite photos from your favorite photographer. Try to recreate them as closely as you can. Don’t worry, you are not stealing someone else’s work but just helping you learn new techniques and a better understanding for your camera settings and angles.
100 paces
This exercise can help inspire creativity. Take your camera and walk 100 paces, then take 20 photos of the location you’re in. Then take another 100 paces and do the same thing. The whole idea is to pay attention to your surroundings and keep finding new and unusual photos to take. It can help familiar place, like your neighborhood or backyard feel new and different.
Create your own restrictions
In this exercise, you choose different restrictions for that particular day of shooting. For example, one day you could shoot only in manual mode. In another day, you could only shoot while sitting or kneeling down. Or you can shoot only with a specific white balance or a specific shutter speed. This will help you to see the many different settings in your camera and the many different types of photos.
Take the preview you away from your screen.
In this exercise, turn off the preview on your DSLR screen and don’t look at any photos until you are done shooting for the day. This can be hard for many photographers because we want to look at the photo we just took as soon as we took it. This happens especially often when we are practicing! This fun exercise helps you to focus more on just taking the photos instead of evaluating their merit.
While we always recommend that the best way to improve your photography skills is to get out there and learn in the moment, these exercises will help! You will learn new ways of seeing things, have a better understanding of your camera and increase your confidence in your photography abilities!
There’s a level of creativity in every type of photography. From portraits to landscape, the best photographers are the ones who are able to see the details and take a new view of something.
This rule applies for sports photography. We know that when you are a new photographer, it can be hard to get a good range of photos. Everything comes down to practice and when you are beginning your sports photography hobby or career, you’ll want to practice taking lots of photos.
We’ve even talked about the three types of sports photos but we wanted to give you an idea of some shots to look for during your sporting events so you can start taking different types of photos and improving your skills
The action shot
We all know this shot but it’s often the hardest one to get because you never quite know when action is going to pop up. But there are a few places you can strategically place yourself to try and catch the action. The action usually takes place near the key areas of the game. So you’ll want to position yourself near the goal, hoop or home plate. Sometimes you may have to anticipate the play. For example, maybe you are shooting first base but see a play developing at home so you may need to run to get to home! The key is to keep shooting and anticipating action.
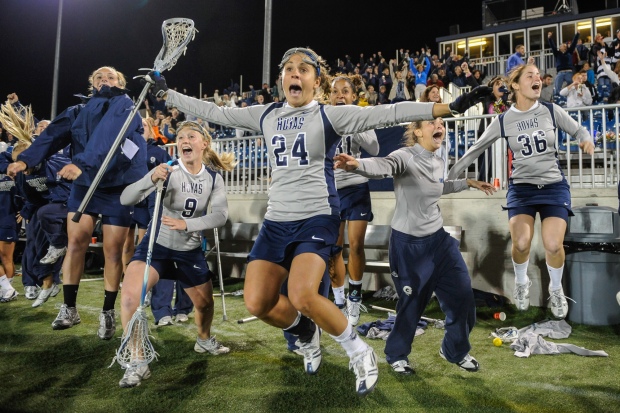
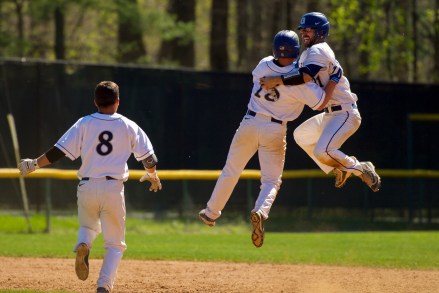
The celebration shot
These are some of the best photos. They are that moment right after the game buzzer or right after the goal. Not only will you want to be positioned somewhere strategically near the action but you want to pay attention to the facial expressions of the players. Try to zoom in as much as possible. What is key to remember with the celebration shot is to keep shooting after the goal or the play. That’s when you’ll get these great photos.
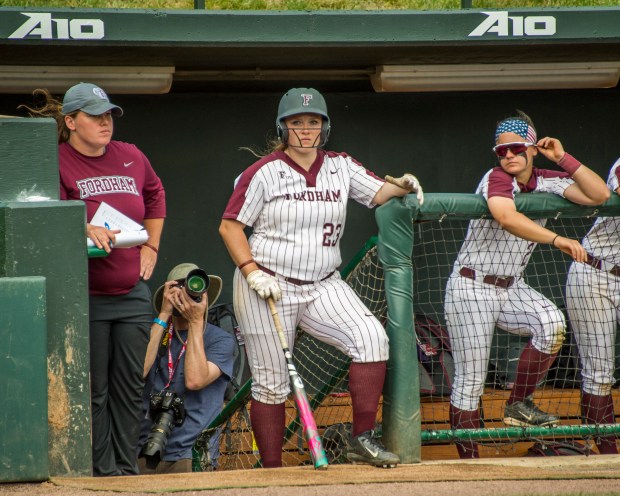
The sideline shot
The action is not always on the field. The sidelines can tell quite a story about a game. While you are shooting, be sure to pan toward the sidelines. It can be especially powerful to do so during moments just before the action shot. For example, if a player is about to step up to shoot a foul shot at the end of the game or a batter is getting ready to swing when their team has two outs. You can often catch the intensity or excitement on the sidelines. Sidelines also make for great celebration shots!
The crowd shot
The players are not the only ones who are part of the game. The fans in the stand can make for great subjects of your photos! Your photos should capture the feeling of the game and fans can play a big part in that feeling. You can often catch great crowd photos during time outs or between innings.
The details shot
These are often the graphical photos that we talk about this post. They are the details photos and you can get very creative with them! For example, the cleats of the players lined up in the dug out or the lacrosse stick laying against the team bench. These photos can serve as excellent opportunities to improve your technical skills when you aren’t trying to catch a certain moment or play.
The next time you are photographing a game, try to experiment with taking at least one of these photos!
Different photography jobs require different approaches. This is especially important in sports photography when every sport and, really, every game is unique. You can’t set up and shoot each game the same way. Sports photography is about telling a story and almost there is a new story every day. It is important to approach each game differently, depending on your assignment and the specific situation.
In other words, don’t shoot the same game twice.
We approach every game differently and that helps us capture compelling photos across different sports and games. Preparing your mindset and your plan to shoot for the game you are at instead of approaching every game the same will improve your skills and, of course, your photographs. Here are three tips for preparing for every game.
Baseball vs Xavier
Understand your assignment.
This is the perhaps the most important thing to do to prepare for your next game. It’s important to understand what your client is looking for and what is important to them. Are you being hired to cover a specific team? Or are you being hired for editorial purposes? Perhaps your focus is on a specific player. If you are a team photographer, have their been underlying stories in the team all season long? Try to think about what story you are telling.
Spend some time getting in the mindset of what your client wants. If you don’t have clients, then experiment on your own. Create an assignment for yourself to practice getting in the mindset or planning for different games.
Study the game.
This is one of the basic tenants of sports photography and it pays to brush up on the game, no matter what. Shooting a baseball game requires different legwork, different angles and different focus than shooting a lacrosse game. Track and field has a different rhythm than basketball. All of these things matter when you are setting up, preparing your shots or planning where you want to start shooting.
Study the players and the teams involved.
You are telling a story in sports photography and you are doing more than capturing action, you are capturing moments. It’s beneficial to have a general knowledge of the players and the teams and perhaps, the stories that have been evolving in the season. Is there a specific player who is known for making big plays? Does a team have a certain pre-game ritual or celebration tradition that you want to capture? These are just some of the things you can pay attention to and try to capture but only if you know them ahead of time by doing your research!
If you are a team photographer, you probably have a really good understanding of the team you photograph on a regular basis but you might also want to get to know their opponent to see if a pitcher is known for spectacular strike outs, a goalie is known for big saves or any other skills that can translate into great action.
Athletes always prepare for their specific opponent and as a sports photographer, you should too! No two games are the same but that is part of what makes sports photography such an exciting experience and a fun challenge!
Don’t miss the latest news from DC Sports Photography Academy! Sign up to receive our blogs right to your inbox:
Our student, Art, shot this game with us over the weekend. Since it was his second game with DC Sports Photography Academy, we tasked Art with acting as the George Washington photographer. His goal was to make GW look great during the game. We think he succeeded, don’t you agree?
It takes more than a fancy camera to take really great photos. While a brand new DSLR will absolutely help improve the quality of your photos, there are some important tricks you can learn when taking the photos to give them look better. In this article we’re going to talk a little bit about the framing and composing a photo. There are no hard or fast rules but following these tips will help you to train your eyes to look for different ways to capture a photo.
The Rule of Thirds
This is one of the most well known composition rules in photography. The idea is to divide the camera’s frame into thirds and place key objects along those lines to improve the composition. This can help make your photos more interesting because it can help the view see more than jus the main subject.
Lines
Our eyes are naturally drawn along lines when we look at photos. Keep horizontal lines level and vertical lines straight. While this does not always lend itself to sports photography, leading lines help lead a viewer’s eyes to the picture.
Balance
If you shoot your main subject slightly off-center to follow the rule of thirds, you can create an interesting photo. But sometimes that leaves an empty void in the scene so look for something that can “balance the “weight” of the photo, like another lesser subject that can help to balance the photo. You can also choose to make a photo unbalanced if you want to create more tension in your photos.
Patterns
Our eyes naturally look for patterns and so photos with patterns often quickly draw people in. Patterns are aesthetically pleasing but you can add more to the photo by having a pattern interrupted.
Eye Lines
When we look into a person’s face, we naturally look them in the eye. In photography a face is a strong visual weight because our eyes are drawn there first and often we look to where the eye-line is pointing. The “eye-line” is technically the implied lines produced if we were to follow a person’s line of sight.
Framing
You can use natural objects to frame your subject, which sets your focal point apart from the image. These objects could be windows or doors or anything that creates a visual boundary around your subject, drawing the views gaze to it.
The Rule of Odds
The human eye is more comfortable with images that contain an odd number rather than even number. This is because the human eye will drift toward the center of the group and when you have an even number, the center is an empty space. So many photographers choose to follow the rule of odds.
Keep It Simple
Sometimes the simple images are the most powerful. Don’t try to get the entire scene and all of the distracting background elements in the photo. You can do this by zooming in or repositioning yourself so the background element is no longer part of the frame.
Remember, a great photographer is one who is able to see different angles of a shot and capture a moment in a unique way. Don’t be afraid to keep experimenting!
Sign up to get free photography tips and guides from DC Sports Photography Academy to your inbox!
A photographer’s job isn’t done after they’ve taken their last photo of the day. There’s still more work to be done once you have taken your camera home. It’s time to edit your photos! Choosing the right photo editing software is about finding a product that the right tools for your skill level and fits in your budget. Here are some of the most popular photo editing software applications available.
Photoshop is the one of the original Adobe photo editing products. It coined the phrase “photoshopped” in our daily conversations. So it’s a good place to start our list. Photoshop has a wide variety of photo editing tools but also tends to be the most expensive.
Adobe Lightroom is extremely similar to Photoshop but it’s equipped for more professional photographers. It has many of the same photo editing abilities as Photoshop does but what really makes Lightroom a great tool is that it makes it easier to organize and categorize a large amount of photos. If you plan on taking more photos over time, Lightroom could be a great investment for you. You can actually get an annual subscription to both Photoshop and Lightroom for $10/month.
Adobe Elements is a great “beginner” version of Photoshop. It has many of the same features of Photoshop but lacks some of the more advanced features. One of the biggest pros of Adobe Elements is the price. It’s $80 for a license, which costs less than an annual subscription to Photoshop or Lightroom.
Affinity was designed for Macs and it can be a happy medium between the extensive Photoshop and Elements, at an excellent price. It has powerful tools, RAW processing and an easy to use interface at a great price. However it does not have the organizational features that Lightroom has.
PhaseOne is another high-end tool that is similar to Lightroom and includes the ability to organize and store your photos in a searchable database. In Capture One, you don’t directly modify your changes so they are only permanent when you export, which is helpful if you need to go back and change an edit.
Corel is another program that’s ideal for beginners. It’s very versatile and easy to use. Similar to Elements, Paintshop costs $99.
If you’re just starting out, you may still be using free tools like Apple photos. This is a good way to get started with editing but if you really want to improve your photos to a professional level quality, investing in one of these software programs can help!


 copy")
 copy")
 copy")
 copy")
 copy")
 copy")
 copy")
 copy")
 copy")
 copy")
 copy")
 copy")


 A photographer’s job isn’t done after they’ve taken their last photo of the day. There’s still more work to be done once you have taken your camera home. It’s time to edit your photos! Choosing the right photo editing software is about finding a product that the right tools for your skill level and fits in your budget. Here are some of the most popular photo editing software applications available.