5 Fantastic Sports Photography Shots

There’s a level of creativity in every type of photography. From portraits to landscape, the best photographers are the ones who are able to see the details and take a new view of something.

This rule applies for sports photography. We know that when you are a new photographer, it can be hard to get a good range of photos. Everything comes down to practice and when you are beginning your sports photography hobby or career, you’ll want to practice taking lots of photos.

We’ve even talked about the three types of sports photos but we wanted to give you an idea of some shots to look for during your sporting events so you can start taking different types of photos and improving your skills
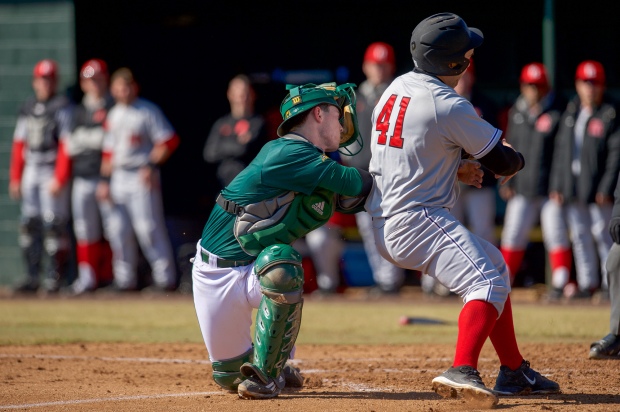
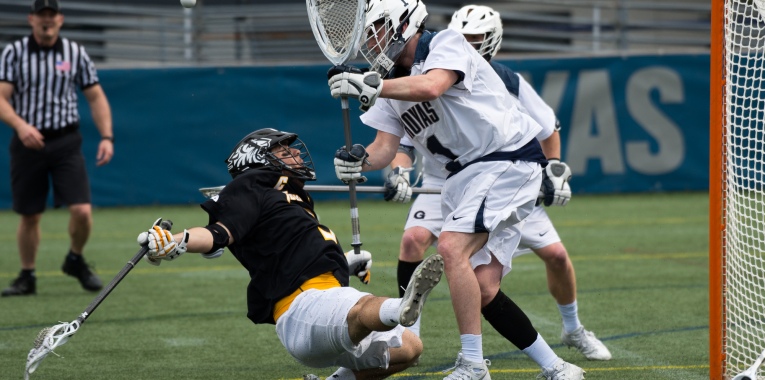
  1. The action shot

We all know this shot but it’s often the hardest one to get because you never quite know when action is going to pop up. But there are a few places you can strategically place yourself to try and catch the action. The action usually takes place near the key areas of the game. So you’ll want to position yourself near the goal, hoop or home plate. Sometimes you may have to anticipate the play. For example, maybe you are shooting first base but see a play developing at home so you may need to run to get to home! The key is to keep shooting and anticipating action.

Action.jpg

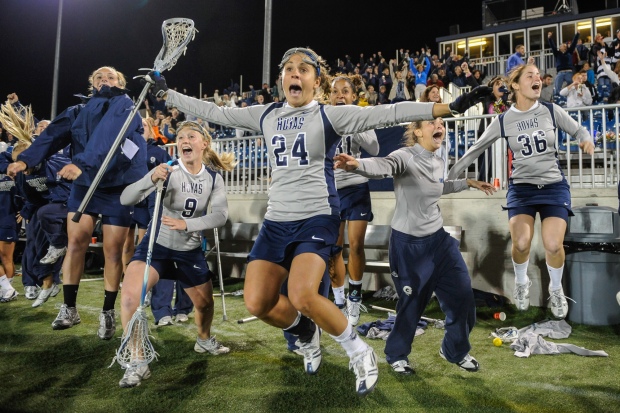
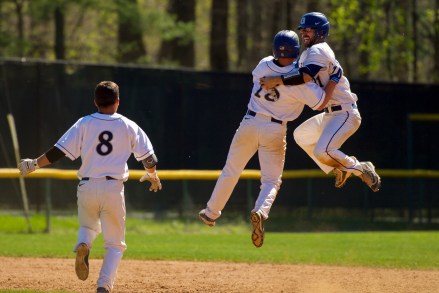
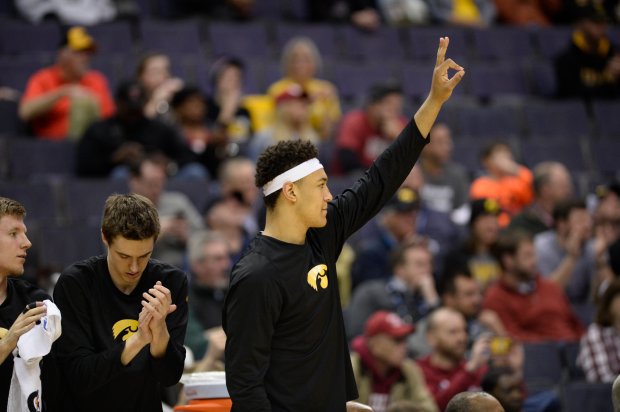
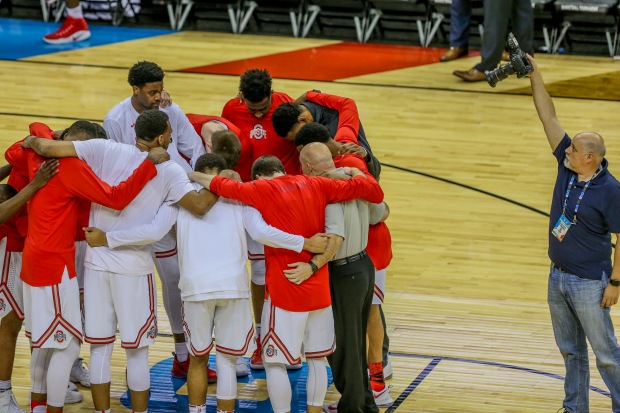
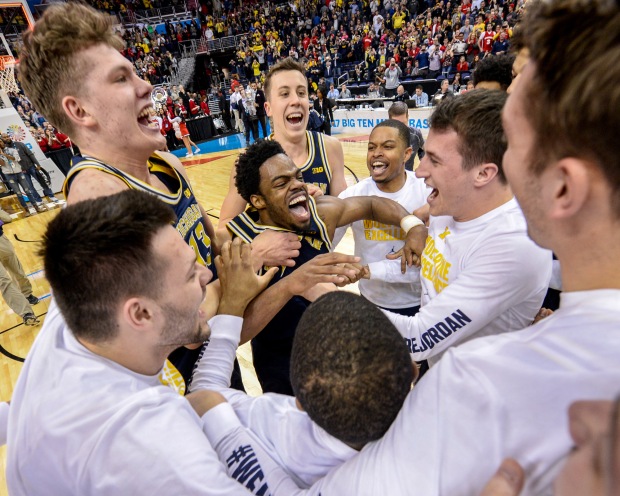
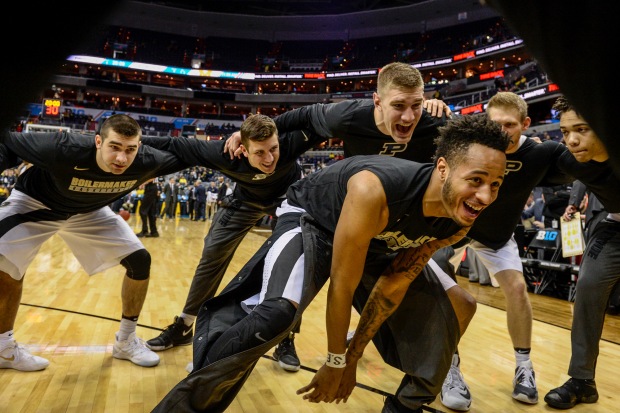
  1. The celebration shot

These are some of the best photos. They are that moment right after the game buzzer or right after the goal. Not only will you want to be positioned somewhere strategically near the action but you want to pay attention to the facial expressions of the players. Try to zoom in as much as possible. What is key to remember with the celebration shot is to keep shooting after the goal or the play. That’s when you’ll get these great photos.

Celebration.jpg

  1. The sideline shot

The action is not always on the field. The sidelines can tell quite a story about a game. While you are shooting, be sure to pan toward the sidelines. It can be especially powerful to do so during moments just before the action shot. For example, if a player is about to step up to shoot a foul shot at the end of the game or a batter is getting ready to swing when their team has two outs. You can often catch the intensity or excitement on the sidelines. Sidelines also make for great celebration shots!
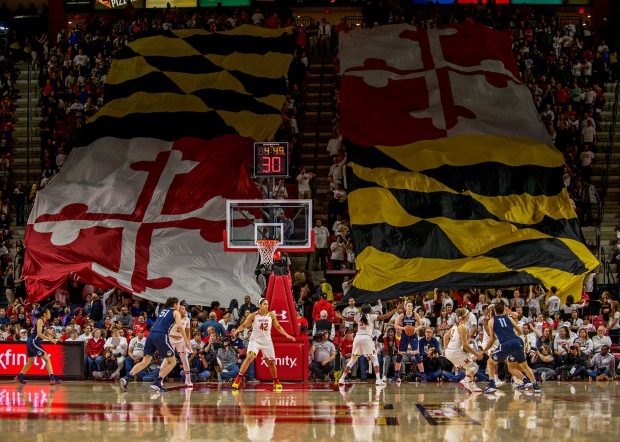
Sideline.jpg

  1. The crowd shot

The players are not the only ones who are part of the game. The fans in the stand can make for great subjects of your photos! Your photos should capture the feeling of the game and fans can play a big part in that feeling. You can often catch great crowd photos during time outs or between innings.

Crowd.jpg

  1. The details shot

These are often the graphical photos that we talk about this post. They are the details photos and you can get very creative with them! For example, the cleats of the players lined up in the dug out or the lacrosse stick laying against the team bench. These photos can serve as excellent opportunities to improve your technical skills when you aren’t trying to catch a certain moment or play.

Details.jpg

The next time you are photographing a game, try to experiment with taking at least one of these photos!

Photographer’s Secret: Don’t Shoot the Same Game Twice

Different photography jobs require different approaches. This is especially important in sports photography when every sport and, really, every game is unique. You can’t set up and shoot each game the same way. Sports photography is about telling a story and almost there is a new story every day. It is important to approach each game differently, depending on your assignment and the specific situation.

In other words, don’t shoot the same game twice.

We approach every game differently and that helps us capture compelling photos across different sports and games. Preparing your mindset and your plan to shoot for the game you are at instead of approaching every game the same will improve your skills and, of course, your photographs. Here are three tips for preparing for every game.

Baseball vs Xavier
Baseball vs Xavier

Understand your assignment.

This is the perhaps the most important thing to do to prepare for your next game. It’s important to understand what your client is looking for and what is important to them. Are you being hired to cover a specific team? Or are you being hired for editorial purposes? Perhaps your focus is on a specific player. If you are a team photographer, have their been underlying stories in the team all season long? Try to think about what story you are telling.

Spend some time getting in the mindset of what your client wants. If you don’t have clients, then experiment on your own. Create an assignment for yourself to practice getting in the mindset or planning for different games.

Study the game. 

This is one of the basic tenants of sports photography and it pays to brush up on the game, no matter what. Shooting a baseball game requires different legwork, different angles and different focus than shooting a lacrosse game. Track and field has a different rhythm than basketball. All of these things matter when you are setting up, preparing your shots or planning where you want to start shooting.

Study the players and the teams involved. _RS17029

You are telling a story in sports photography and you are doing more than capturing action, you are capturing moments. It’s beneficial to have a general knowledge of the players and the teams and perhaps, the stories that have been evolving in the season. Is there a specific player who is known for making big plays? Does a team have a certain pre-game ritual or celebration tradition that you want to capture? These are just some of the things you can pay attention to and try to capture but only if you know them ahead of time by doing your research!

If you are a team photographer, you probably have a really good understanding of the team you photograph on a regular basis but you might also want to get to know their opponent to see if a pitcher is known for spectacular strike outs, a goalie is known for big saves or any other skills that can translate into great action.

Athletes always prepare for their specific opponent and as a sports photographer, you should too! No two games are the same but that is part of what makes sports photography such an exciting experience and a fun challenge!

Don’t miss the latest news from DC Sports Photography Academy! Sign up to receive our blogs right to your inbox:

Enter your email address to subscribe to this blog and receive notifications of new posts by email.

8 Tips for Taking Photos Like a Pro – even if you are a beginner!

It takes more than a fancy camera to take really great photos. While a brand new DSLR will absolutely help improve the quality of your photos, there are some important tricks you can learn when taking the photos to give them look better. In this article we’re going to talk a little bit about the framing and composing a photo. There are no hard or fast rules but following these tips will help you to train your eyes to look for different ways to capture a photo.

The Rule of Thirds

Rule of ThirdsThis is one of the most well known composition rules in photography. The idea is to divide the camera’s frame into thirds and place key objects along those lines to improve the composition. This can help make your photos more interesting because it can help the view see more than jus the main subject.

Lines

Lines

Our eyes are naturally drawn along lines when we look at photos. Keep horizontal lines level and vertical lines straight. While this does not always lend itself to sports photography, leading lines help lead a viewer’s eyes to the picture.

 Balance

Balance

If you shoot your main subject slightly off-center to follow the rule of thirds, you can create an interesting photo. But sometimes that leaves an empty void in the scene so look for something that can “balance the “weight” of the photo, like another lesser subject that can help to balance the photo. You can also choose to make a photo unbalanced if you want to create more tension in your photos.

Patterns 

Paterns

Our eyes naturally look for patterns and so photos with patterns often quickly draw people in. Patterns are aesthetically pleasing but you can add more to the photo by having a pattern interrupted.

Eye Lines

George Mason vs St. Joseph's Women's BasketballWhen we look into a person’s face, we naturally look them in the eye. In photography a face is a strong visual weight because our eyes are drawn there first and often we look to where the eye-line is pointing. The “eye-line” is technically the implied lines produced if we were to follow a person’s line of sight.

Framing 

Framing

You can use natural objects to frame your subject, which sets your focal point apart from the image. These objects could be windows or doors or anything that creates a visual boundary around your subject, drawing the views gaze to it.

The Rule of Odds

Rule of OddsThe human eye is more comfortable with images that contain an odd number rather than even number. This is because the human eye will drift toward the center of the group and when you have an even number, the center is an empty space. So many photographers choose to follow the rule of odds.

Keep It Simple

Sometimes the simple images are the most powerful. Don’t try to get the entire scene and all of the distracting background elements in the photo. You can do this by zooming in or repositioning yourself so the background element is no longer part of the frame.

Remember, a great photographer is one who is able to see different angles of a shot and capture a moment in a unique way. Don’t be afraid to keep experimenting!

Sign up to get free photography tips and guides from DC Sports Photography Academy to your inbox!

Enter your email address to subscribe to this blog and receive notifications of new posts by email.

Georgetown vs. St. John’s Men’s Lacrosse

This past weekend, DC Sports Photography Academy took our newest student to the lacrosse field to capture the Georgetown Hoyas men’s lacrosse team take on St. John’s.

Art is a music teacher at a local public school who has been enjoying sports photography as a hobby over the last year. His goal was to improve his skills so that he could have more of those “keeper” photos by learning to use his equipment better and experimenting with his photography style.

Have a look at the great shots Art took during the game!

Art will be back to shoot different sports with us later on this season and we look forward to watching his photography evolve!

At DC Sports Photography Academy, you can create the learning experience you need to learn the skills you want! Whether you shoot one game or multiple or shoot different sports or focus on one style; it’s a completely customized experience! Learn about our packages here.

Love sports photography? Sign up to get our blogs straight to your inbox!

Enter your email address to subscribe to this blog and receive notifications of new posts by email.

6 Tips for Taking Better Photos of Your Kid’s Sports

There’s nothing quite as fun as watching your child enjoy learning and playing sports. As a sideline parent, you have the important job of supporting them, no matter what goes on in the game. In addition to cheering on your kids, you may want to capture some photos of them so you and your child can remember their sports days for years to come!

But sports photos are tough to catch! How many times have you tried to photograph your child mid-shot only to wind up with a blurry photo? It happens to the best of us but there are a few simple tricks you can learn to decrease the chances of blurry or low quality photos of kid’s sports.

  1. Increase your shutter speed and use wide aperture

Women's Basketball vs Dayton
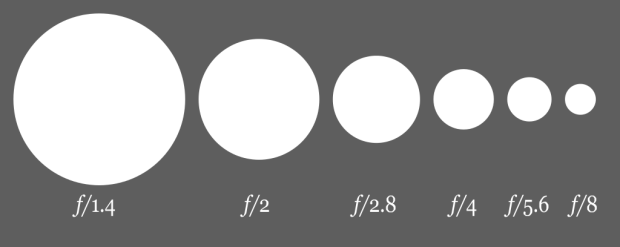
Increasing your shutter speed is one of the best things to do if you want to decrease the risk of blurriness in your photo. Fast shutter speeds help you freeze the action. Selecting a wider aperture will allow for a faster shutter speed and it also creates a more shallow depth of field, which is critical when you are focusing on your player.
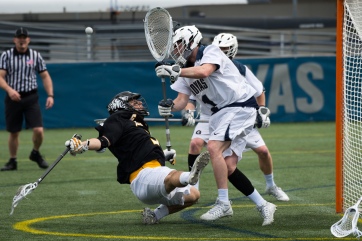
2. Pay attention to your surroundings

When you are framing your shot, you want to take the background into consideration. You don’t want anything distracting in the background that could distract from the subject of the photo. You may want to invest in a zoom lens to help you zoom in or you can experiment with different angles to get the best shot.

3. Get on their level

When shooting kids sports, you may need to get down on their level. After all, you want to capture their expressions and the experience as closely as possible. That can mean kneeling or crouching down to capture the photos.

4. Pay attention to light youth sports photos

Good or bad lighting can make your photos look spectacular or turn them a terrible mess. If shooting outdoors on a bright sunny day, always try to shoot with the sun at your back to avoid being backlit. Cloudy days are by far the best for outdoor sports. The soft nature of the light coming through the clouds means you can shoot in any direction with no issues, but remember to raise your ISO to keep your shutter speed high. Indoor lighting can be poor and can make even the best composed photos look awful. The only solution is to use a lens with a big aperture and to increase your ISO even if it ends up higher that you’d like.

5. Don’t stop shooting

Even if you’ve think you have caught the perfect shot, it might not mean that you have! Keep pressing the shutter button to try to capture as many photos as possible. You never know what you will catch! And don’t miss out on the action because you’ve taken the time to look down at your photo after you’ve taken it. You can review your photos after the game but for now, keep shooting!

Men's Basketball vs Fordham

6. The photos don’t have to stop when the action does.

There is more to the game then when your kid is at bat or kicking the ball. Look for moments when they are laughing with their teammate or talking to the coach or high fiving another player. Those moments are magical in sports as well and sometimes, they are even more memorable than those action photos!

Finally, perhaps more important than anything, don’t be so focused on the photos that you miss the game. Sports can be an extremely special times in a child’s life and you don’t want to miss out on the moments because you’re trying to find the right angle for the shot! Every now and then, it’s ok to put down the camera and enjoy!

Want to improve your sports photography skills? Learn about our customized packages! 

A Beginner Sports Photographer’s Guide to Aperture

We’ve talked about camera settings and how to take better action photos but if you want to take your photography skills to next level, you will want to get to know a few key settings. Over the next few posts, we will be taking a deeper dive into some of the important techniques and settings in sports photography.

We begin with one of the most talked about subjects in photography, aperture. Aperture is the opening in the lens through which light travels through. The size of the opening can be adjusted to let more or less light in. The larger the aperture, the more light hits the sensor and the smaller the aperture, the less light will hit the sensor.

It might be easier to think about the aperture like the pupil of a human eye. The iris of your eye (which is the colored part of your eye around the pupil) expands and contracts, controlling the size of the pupil. The smaller the pupil, the less light can hit the retina. The camera works in a very similar way. The smaller the aperture, the less light that can hit the sensor.

The aperture is measured in f-stops. When you change the f-stop on your settings, you change the size of the opening in the camera. Here is the tricky part of aperture that might take some getting used to: the higher the f-stop number is, the smaller the opening. The smaller the f-stop is, the larger the opening.

This image from Wikipedia gives a look at f-stops. The size of the circle represents the size of the lens of the aperture. As you can see, the larger f-stop number, f/8, has a smaller aperture.

1024px-Aperture_diagram.svg

It might take some practice remembering that but for now just remember that the larger the number, the smaller the opening.

So how does aperture effect a photo? The aperture controls the depth of field of a photo, which is the amount of the photo that is in sharp focus. Have you ever seen a photo where the background of the photo is slightly blurred but the subject in the foreground is in sharp focus? That’s a shallow depth of field. A large depth of field is when the the entire scene is in sharp focus.

Let’s look at some examples. In this photo, there is a small or narrow depth of field, as the players are in focus but the fans and the fans are out of focus.

_RS16180

But in this photo, there is larger or wider depth of field. Even the players in the back are just as much in focus as the players closer to the camera.

mens lacrosse

The difference of these two photos depend on the aperture. So how can you change the aperture and create these different photos?

First you want to find the aperture of your lens. All lenses have a maximum and minimum aperture size and you will find these sizes printed on your lens. Older lenses have an aperture ring that you need to turn to adjust the aperture. You will see the numbers on the lens and you will adjust the ring to match the aperture you would like to set.

However, most modern don’t have aperture rings and instead, you set the aperture in the camera. The aperture can be set in Manual or Aperture priority mode. Aperture is designated on your screen as the number with the F in front of it.

Once you have found the right mode and adjusted the aperture, you can experiment shooting in different f-stops to capture different depth of field. Remember, if you want a particular subject to be in sharp focus, you would use a smaller aperture number. This isolates the foreground from the background making the foreground objects look sharper and the background blurred.

But if you want a wide or large depth of field, where most of the photo is in focus, like in the second photo, you would use a larger aperture number. This allows the image be in sharp focus from front to back with no blur.

Aperture also works together with shutter speed and ISO to create exposure but we’ll talk about that in a future post. For now, we recommend experimenting with the different aperture sizes to see how it makes a difference in your photos.

Be sure to check back for more blogs about the different camera settings for great sports photography or sign up to receive our blogs by email!

Enter your email address to subscribe to this blog and receive notifications of new posts by email.

Using Wide Angle Lenses in Sports Photography

Sports is normally shot with a long zoom to bring the action closer to the viewer, but what if you want to bring the viewer to the action?

A wide angle lens is perfect for this. Because of its short focal length, a wide angle lens requires the photographer to get up-close-and-personal with their subject, therefore bringing the viewer along with them. In the photo below, we caught our expert teacher, Rafael, shooting with his wide angle lens.

AB8U0148

Wide angle lenses will add depth to the photo. They help you keep everything with the frame in sharp focus and the view from a wide angle lens will make the viewers feel like they are part of the action. Can’t you feel the action in this photo? That’s because we were shooting with a wide angle lens!

_RS10524

Wide angle lenses are about capturing close up moments and being a part of the action. To use a wide angle lens correctly, we recommend getting as close as possible to the action. You want to be sure you are focusing the camera on your subjects. Sometimes this means getting low and down where the action is! This will create depth and help your subjects stand out in the photo in a way that draws the viewer into the moment. An example is the photo below, you truly feel as if you are in the circle with the team.

_RS17029

With more elite sports, you may not be able to get into the action to practice shooting with the wide angle lens. However, if you are shooting youth sports, there are plenty of opportunities to get near the action and practice shooting wide angle. Have a photo that you took with a wide angle lens? We’d love to see it! Tag us in it on our Instagram or Facebook @DCSportsPhotographyAcademy.

If you would like to invest in a wide angle zoom lens, you have many options. Here are some of the excellent wide angle zoom lenses for Canon and Nikon cameras!

Receive expert photography tips and guides right to your inbox by signing up for our newsletter!

Enter your email address to subscribe to this blog and receive notifications of new posts by email.

Georgetown vs. Duke Men’s Lacrosse

This past weekend, DC Sports Photography Academy and our newest student, Bill, were on the sidelines when the Georgetown Hoyas took on the Duke Blue Devils in men’s lacrosse.

Bill has long been a photo enthusiast. When he son began playing youth sports,  Bill began photographing his games. He enjoyed photography so much that he began to upgrade his equipment and turned his passion for sports photography into a full-fledged hobby. He currently photographs for a George Mason men’s basketball blog and he loves doing it. He will also work for his alma mater, Elon University, when they are in town.

Before the game, we worked with Bill on setting up his camera for fast action and finding the right shooting location. It can be difficult to find the right spot and get focused during fast action play but as the game continued, Bill became more comfortable.

After the game ended, we talked about the best techniques for editing photos. We went through his photos together so we could offer him pointers on how to edit each photo so that the finished photo is truly spectacular.

As you can see in the incredible photos below, Bill caught on quickly! Now that Bill is armed with more knowledge and skills, we can’t wait to see how Bill takes his lessons with DC Sports Photography Academy and continues to shoot fantastic sports photos!


Are you ready to start shooting like a pro, like Bill? All skill levels are welcome at DC Sports Photography Academy! Visit our Packages page here to learn more about our packages and book your game today!

Understanding the Three Types of Sports Photos

Sports is more than just action shots. A great sports photographer captures each part of the sporting event, telling an entire story through their photos. You can also do this by focusing on three different types of photos you can take during a sporting event.

rm7_2213

Action Photos

As the name implies, these photos focus on the action in the game. It’s the jump shots, the goalie saves, the finish line crosses. These photos require you to anticipate the action of the game and be scanning the field and moving with the action.

To capture great action photos, we recommend having a basic understanding of the sport you are shooting and positioning yourself in a place where the action might take place. Sometimes that means running to home plate to catch a runner coming home.

Men's Basketball vs FordhamEmotion Photos

There is more to sports photography than the actual action. Sports photographers also capture the emotions of the athlete and the game. You want to think about the bigger story of the game, more than just the plays. It may be capturing an injured athlete being support from his teammate. Or the fans reactions after a game-winning shot.

If you want to capture emotions in your photos, it is important to continue shooting even after the whistle blows. Some of the best emotions occur just after the play. And remember, it’s not only the players who have emotions throughout the game. Remember to shoot the coaches, the team members not in the game and the fans as well. Those types of shots can add to the story.

crowdlas02.jpgGraphical Photos

Graphical photos are not as well known as the other two types of photos but they are often the most spectacular shots. In graphical photos, photographers tell the story through little details and small moments. For instance, in a group photo where the helmets of the players are all pointed to the coach, giving his pre-game speech.

It’s the details that help add to the story like  the shot of a challenge flag lying at the coach’s feet or the catcher’s mitt lying alone on the bench. These powerful photos will add to overall story and look great in a portfolio. So be on the look out for visually appealing graphical moments during the games and look for the tiny details.

When you add these three different types of photos together, you are able to truly tell the story of the sport though your photos, which is exactly what a great sports photographer does in every game!

Want more photography tips and tricks? Follow our blog to receive latest posts straight to your inbox!

Enter your email address to subscribe to this blog and receive notifications of new posts by email.